Saturday, November 15, 2014

Old Beads and Scraps

Hello there!

By Rachel Scarlett

Today I am posting a simple way to make some really fun earrings! This craft doesn't take too long and can be very useful in your own wardrobe or for gifting. The possibilities are endless (and cheap!).


I started by rummaging through my miscellaneous craft-piece drawers (......junk) and I found these:

If the chunky wood beads above look familiar, they may have been seen around your grandmother's neck on a necklace from that vacation she took to Africa.... I believe this necklace once had a large wooden parrot and/or elephant on it. If grandma hasn't been to Africa recently, then I have also seen many wooden chunky necklaces in places like Goodwill. I have an entire drawer devoted to broken jewelry and that's where these came from. If you don't have anything like this you can use old buttons or anything flat and round~ old game pieces, bottle caps, or even pennies!

Next, I found some lace, glitter, and paper. This is where it gets fun, you can really use anything.


 Paper & Modpodge 
There are a million different kinds of paper. For these you just trace, cut, and modpodge. 

Tips and Alternatives: Make sure the cut circles fit the bead, I even cut mine a little smaller than the bead because I liked the look of the wood edge. When applying the modpodge, there is only need for a thin layer. Use your thumb to flatten out all bubbles or wrinkles when you place the paper on the bead face. Once dry, another layer of modpodge over top of the paper and bead face will help protect the paper.


Lace & Modpodge
This is similar to applying paper but I trim after applying the lace: 
 Tips: As you can see I did not cut the lace to fit the bead till after applied. Apply the modpodge a little heavier for the lace - don't worry, it will all disappear when dried. I also applied a good 1 to 2 coats over top the lace to make sure it was completely secure. Once dried and stiff, I used a small set of sharp scissors to trim closely around the edge; a razor blade can work too.
 Alternatives: Although I chose to show off the edge of the lace and only cover half the bead, you can most definitely cover the whole thing. Fabric can also be applied this way and add a bit more texture than paper.


Glitter
This uses glitter and modpodge (or glue). Just coat the bead and dip.
Tips: This usually takes several layers of glittering. Each time, I flatten down the sparkles with my finger, into the glue, let it completely dry and put on another layer. Also, brush or tap off any extra glitter before adding the next layer.   You can apply a top coat of modpodge, it won't take away the sparkle and will prevent your husband from getting angry at trails of glitter droppings ;).


Earring Backs
And of course at the end of all the decorating, it's time to make these functional! Earring backs will have to be bought from a craft store. Super glue worked well for these but you might consider a thicker glue depending on the surfaces you will be gluing. As you can see, I offset the backs on the bigger lace earrings, preferring that they sit a little lower on my earlobe.

And there you have it! A few new fun earrings! Just find something little and round, add some glue and paper and easy peasy. 


These are so much fun because you can make them specifically for any outfit or person. Other ideas for supplies could be newspaper or magazine pages, cartoons, monogram letters printed on paper, holiday inspired paper, wrapping paper, fabric, perhaps fall leaves.... The map earrings above are specifically made from maps of a road trip I took with a friend, so they are more of a memento for me than the others. You don't have to be in a craft store to get crafty, see what's around you!


Monday, October 27, 2014

Reboot After a Busy Summer

By Rachel Scarlett

Hello All! Long time, no see! It was hard to do much for the blog over the summer: Pregnancy + Full time farm work = Sleeping in all free time. However, despite my spotty appearances, I am motivated to try to make this work. SO I would like to share a few crafts I did, for what else? Our baby nursery.   

As the colors needed to be gender neutral, I started out with the color combination of red, yellow, and turquoise. Those colors appear all over in my house so it would be easy to pull from decorations that I already had. When re-decorating a room, I think it's important to get creative and use what's around you because seriously, who has the money to do a complete redo with all new things?? I don't! I watch these TLC shows and they redo a room for thousands of dollars! Where's the creativity in that? Besides not being creative, it's also not very sentimental having a room full of new things. I was determined to take from what I had in combination with the baby gifts I received to create a nice setting for the nursery. And my inspiration started with 2 things: my love of turquoise and a quilt given to me by none other than the wonderful Cara Joy! The furniture in this room does not add up to much; the crib was a gift and the one my husband slept in as a child, my beautiful rocking chair was my parent's gift to us, and the changing table was found on craigslist.

Like I said before, my first goal was red, yellow, and turquoise. It changed a little when I was given this wonderful quilt:


Orange did not really fit into my color scheme until now. Red and orange was not working for me especially if we ended up adding pink for a girl. My solution came when my husband had some time off and brought me home a globe from a yard sale! Globes have not only a mass of turquoise, but also every other color! Pinks, oranges, a tiny bit of red.... It works.


In order to use the globe, I took it out of its plastic frame (kind of tacky), used the wire from a coat hanger to put through the middle, and bent loops on both poles. On one side I put a crystal, and the other a chain to hang from the ceiling. To help these things come together I chose to paint several southwestern inspired paintings. The southwestern style helped pull together my colors, and include my love of western/cowboy art.  


I also made a card holder to go above the changing table. For now it holds the cards from my baby shower but eventually I will put up photos of the baby with family and friends. It was a fairly simple project; I spray painted a frame bought at Goodwill Outlet a while ago ($.25). Then I took string and tied it between the staples that would have been holding in the glass and original picture. String can also be simply hot glued or tacked to the back sides of the frame if there are no staples. Clothespins from the dollar store finished it up for easy hanging.


Really, any color can be put into this room. If we have a boy, the cowboy and country will be emphasized, and if we have a girl I'll add a touch of pink!


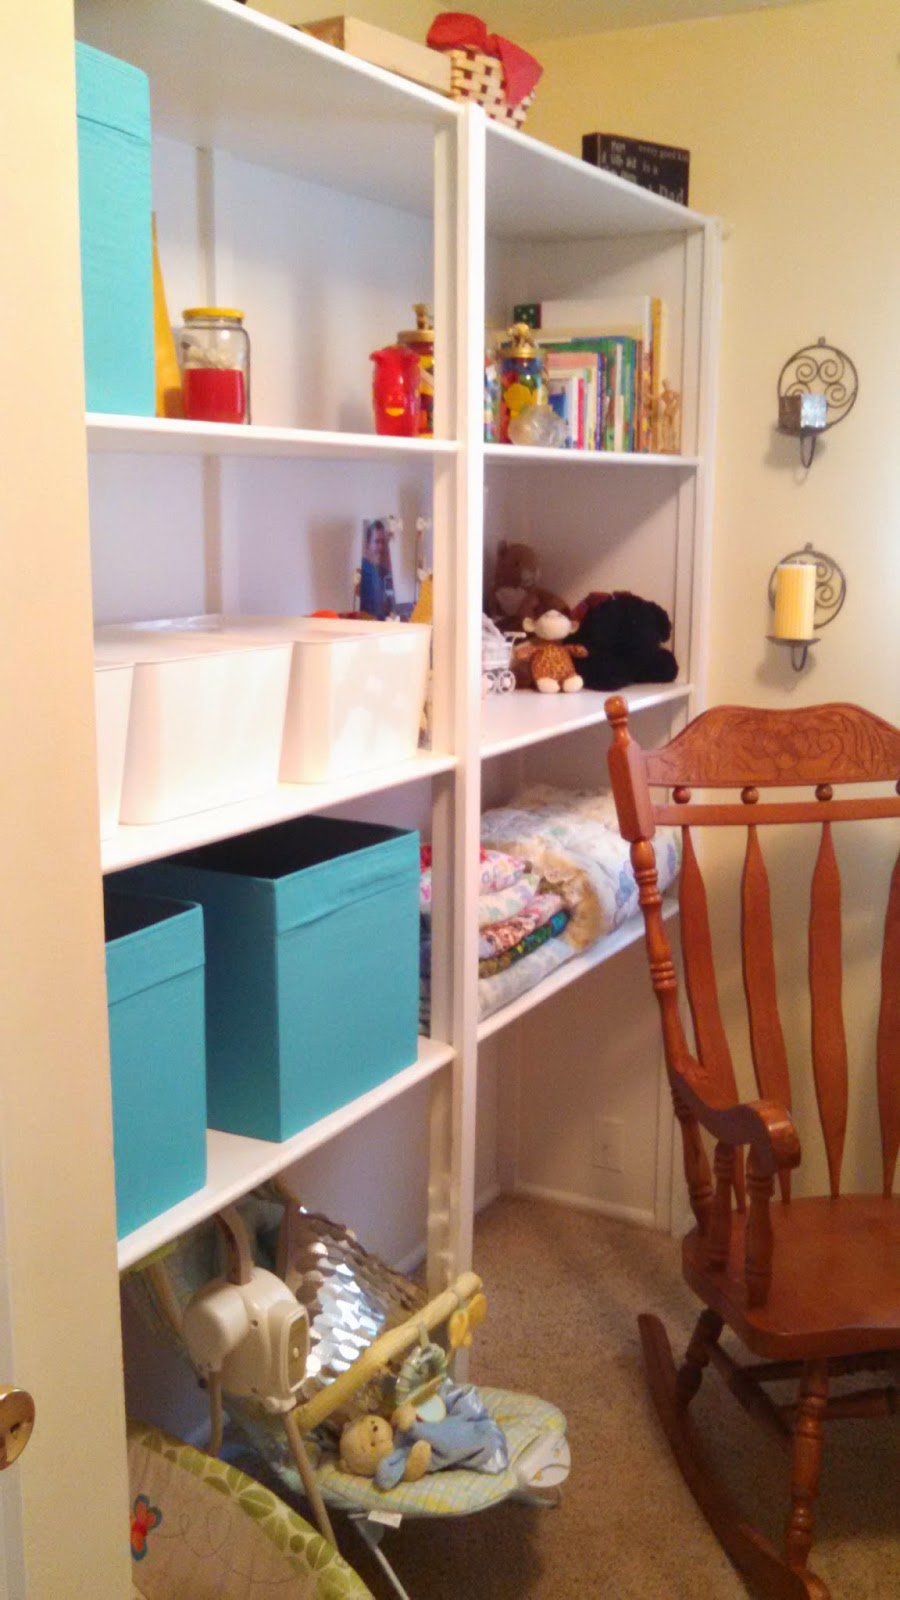
Future toys and story books! The wall hangings I found at a yardsale for a buck. The top holds a keepsake from my childhood and the bottom an IKEA candle. Below is a shower gift made by a friend and it is filled with a yardsale find ($2).

The curtain above is a thrifted sheet.
Out of all the things in this room, these (above) are brand new and personally bought. These IKEA tubs make up for the dresser we didn't have room for.
Above is a retired calendar page, a favorite framed greeting card, a wedding gift, and thrifted glass birds in a pickle jar!
This room was able to come together with things that I already had. It's hard to see the potential of things that have been around us for so long compared to seeing something new and shiny in a store. I encourage you to get creative and try to use your belongings in new ways when redecorating a room. It'll save a lot of money and can be a lot of fun!

Thanks for reading! Our Etsy shop will be rebooted as well with many new things!

Sunday, June 8, 2014

Lace and Denim

Hello! After a long break, here is another post and this one deals with a softer medium: lace. In the last few years lace has made a comeback in fashion and has itself all over both formal clothing and average casual wear. I am NO expert on fashion however I was able add a little fun to an old denim jacket :).

I found some lace at a yard sale that was probably made awhile ago by some hobbyist. It was $2.50 for 4 pieces.
I had seen lace added to clothing, on shorts or the back of shirts. I also thought the only other place I'd find something like this was as an antique in my grandma's sewing room or expensive as heck in a craft store. I thought it was a fun find, so I grabbed it.

Later on I realized I had a denim jacket with some stains on it. Not super noticeable but could use a little fix up.
This is when the lace came in handy! Even though the lace will not completely cover up the stain, it will definitely distract from it. So I decided to tack on the lace with a little hand stitching. You could also use adhesive and iron on but I chose this way in case I would ever want to remove it.
I anchored it down in three corners with a few good stitches and then stitched loosely around the edges. It really didn't take too long, it was a fun a little project, and added some flair to a standard jacket.
There's also tons of other options for adding lace to jackets! I tried out a few before I started sewing, including other lace from yard sale finds:


I've already worn the jacket a bunch, an easy peasy project for a lazy afternoon :)

Also! Don't forget to check out our Etsy shop at Scarlett Joy Creations! There's not a whole lot up now but that will change someday. Find these fun hangings here at our shop!


Tuesday, March 25, 2014

WSU Plate

Hello!  Cara Joy here!

I'm so happy Rachel has taken the time to get this blog and Etsy shop going for us!  This week is my spring break so I have a little extra time to contribute and catch up on all things not related to school.  Yeah!

My big project for the week has been getting my greenhouse up and going.  So far I've planted some seeds and put flooring down.  Tomorrow I hope to drag some more pots out to it so I can prep them for flowers.

Anyway, Rachel sent me a Chandelier License Plate a few weeks back.  I debated where to hang it until yesterday.  Yesterday, as I was finishing up in the greenhouse for the day, I realized my chandelier would look great hanging from the ceiling of my greenhouse.  It's so perfect because its WSU and goes well with my WSU garden gnome!  What do you think?  Just imagine the possibilities!


Monday, March 24, 2014

First Ever Post! And Etsy!

By Rachel Scarlett

Hello! Welcome to Cara and I's blog! This blog was made to support our Etsy shop and to have an avenue to share creativity. While I am brand new at blogging, Cara is not! So thankfully she is a part of this in case I get overly boring ;). While reading my posts I ask for your forgiveness of grammar mistakes or anything related because seriously, I don't like computers, I am terrible at writing, have no interest in photography, and I really don't like putting myself out there! Those are all pretty vital parts of having a blog... Why am I part of a blog then??? Like I said, to support our Etsy. I love making things and figured I should start putting a little more effort into it than the random, mess-making, Saturday project.

So! I would like to show you my first efforts in selling my goods. For this Esty product I used license plates, crystals, and paint! (always gotta have paint!) Bottle caps, bullet casings, old labels, and outdated license plates are a few of the things that seem to accumulate around me. In reality, this is all junk (except for maybe the casings). My license plates aren't even valuable!

Recently having had an obsession with chandelier type hangings, whether lighted or not, I decided license plates would work great with this. First I used an old Illinois plate to hang with crystals. Using the rustic-ness of the plate for the decorative side of things.
There are a lot of bold colors in my home, much like most of the license plates out there, so almost any license plate in any form would look good in my settings - and let me tell you, there are a lot! However, if I wanted to sell these things I would have to get a bit more creative, especially since most of my plates are not from 1973! And this is where paint comes in handy. 

Using large numbers, letters, and phrases have become very popular in home decor, Pinterest can tell you that! So I thought painting boring plates in popular solid colors would show off the numbers well, while also being a nice accent piece. And there ya go!

I imagine these hanging in a corner of the living room, by the mirror in the bathroom, or maybe even in a baby nursery by the crib ;)

Some of them I left without paint for anyone interested in a more patriotic effort toward their home state:

 Being from the Pacific Northwest, that is probably where all the plates will be from!

I hope you enjoyed my first ever post! If you want to check these out, we are selling them on Etsy! Come see our shop! You can find us at here at: Scarlett Joy Creations. We will be adding more and more as we go along, and I am sure you will hear from Cara Joy soon!

Have a wonderful day!